Official manual · First-time setup
Shadowrocket Setup Guide From import to connection verification
Follow the sequence: add your connection details, choose a mode, connect, and verify. For initial setup, first verify one known working connection, then adjust rules and On Demand settings.
STEP 01 / Prepare connection details
Add a server or import a subscription
Done when: a selectable server appears in the SERVER group on Home, not just a saved link.
After opening Shadowrocket, first identify what you have: a subscription link that returns multiple server entries, or the complete details for one server. These use different entry points and serve different purposes. A subscription retrieves and updates a group of entries; adding a server manually saves a specified server on your device. For your first setup, choose either method. There is no need to import the same details through every entry point.
Have a subscription link? Use Subscribe
Copy the complete subscription link from your service provider, open Config, find Subscribe, and follow the prompts to paste the link, enter a recognizable name, and save it. Then update the subscription. The entry point may move as the app interface changes, so use the Subscribe option shown in your current version. Query parameters are part of the link: do not remove anything after the question mark or use a help page URL as a subscription link.
When the import finishes, return to Home and check the SERVER group. If the subscription was saved but no servers appear, first check the update result and confirm that the server returned data the app can recognize. A subscription and a configuration file are not the same thing: a subscription mainly provides server entries, while a configuration file may also include rules and other settings. Do not replace an existing configuration just to import a subscription.
https://example.com/sub?token=xxxxThis is a format example only, not a working subscription. Real links often contain personal credentials. Do not post them in public comments, screenshots, or shared documents.
Have server details? Use Add Server
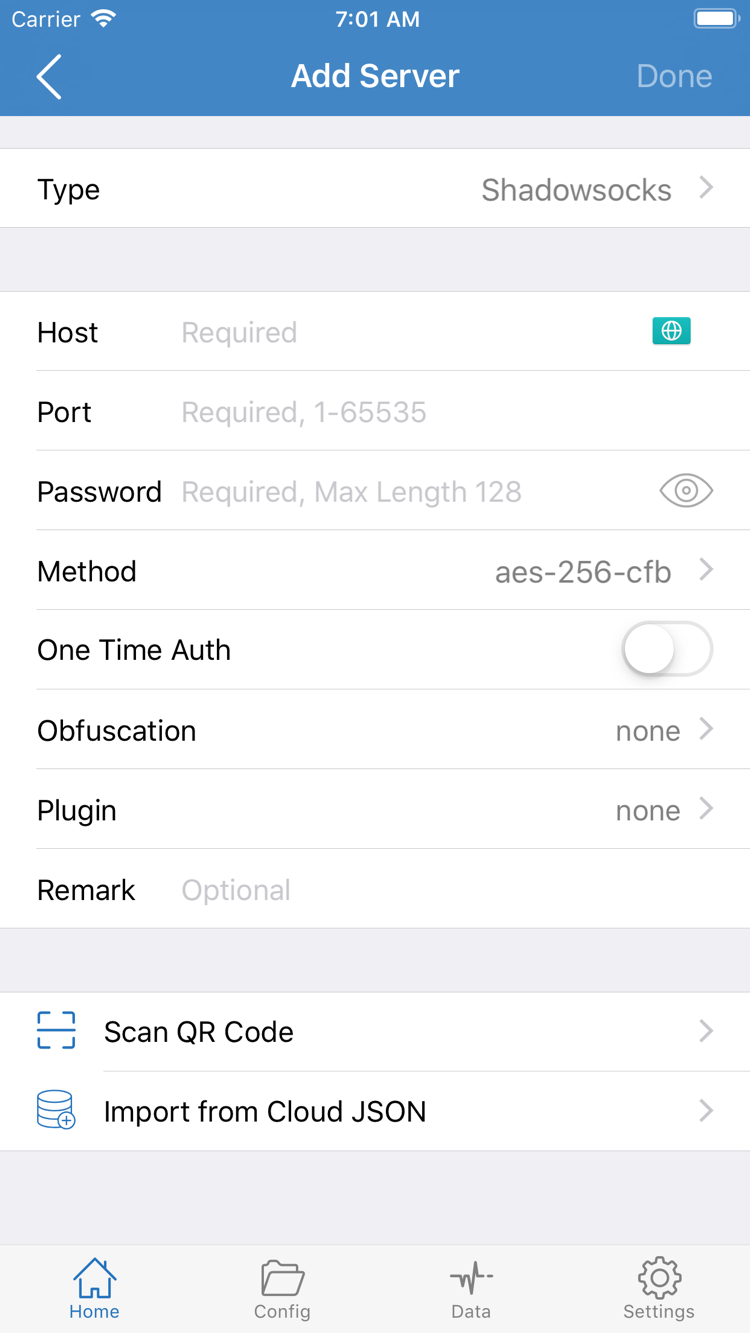
Return to Home and tap Add Server in the SERVER group. First choose the Type that matches the server, then enter Host and Port. Fill in Password, Method, or other authentication fields as required by that Type. The screenshot shows one set of fields; other Types, such as VLESS and Trojan, use different fields. Do not apply the screenshot's fields indiscriminately to every protocol.
Host is generally the domain or IP address provided for the server. Do not add a webpage path to it. Port must match the server's listening port. For Types involving TLS, transport, a path, or a server name, check each parameter against the details from your service provider. An address and password alone do not mean setup is complete. After saving, return to Home, select the entry you added, and check its selection indicator.
If you have your own QR code, use Scan QR Code. Import from Cloud JSON is for importing the corresponding format, not a general-purpose entry point for arbitrary webpage links. Check Type, Host, and Port after importing. Saving a server only means its details have been added to the client; you still need to verify the connection. To compare the available methods, see Four Ways to Import Subscriptions and Servers.
STEP 02 / Choose how requests are routed
Choose a Global Routing mode
Done when: you can distinguish the selected server from the routing mode and confirm which configuration is in use.
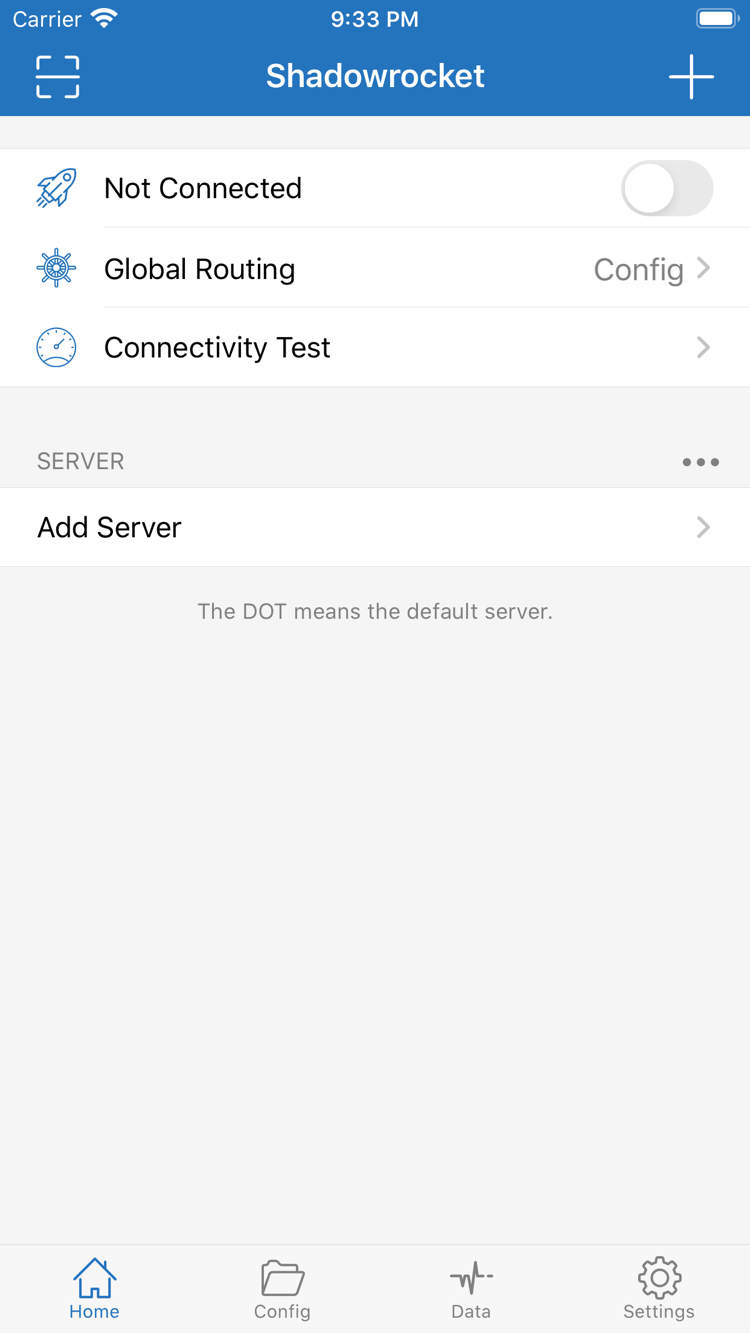
After adding a server, return to Home and tap Global Routing. This controls how requests are handled. It is separate from choosing a server in SERVER. Switching servers without checking the mode may leave requests handled as before. For a first setup, focus on the three modes: Config, Proxy, and Direct. If Scene is also displayed, leave it unchanged until you have verified the basic connection.
Config: route according to the current file
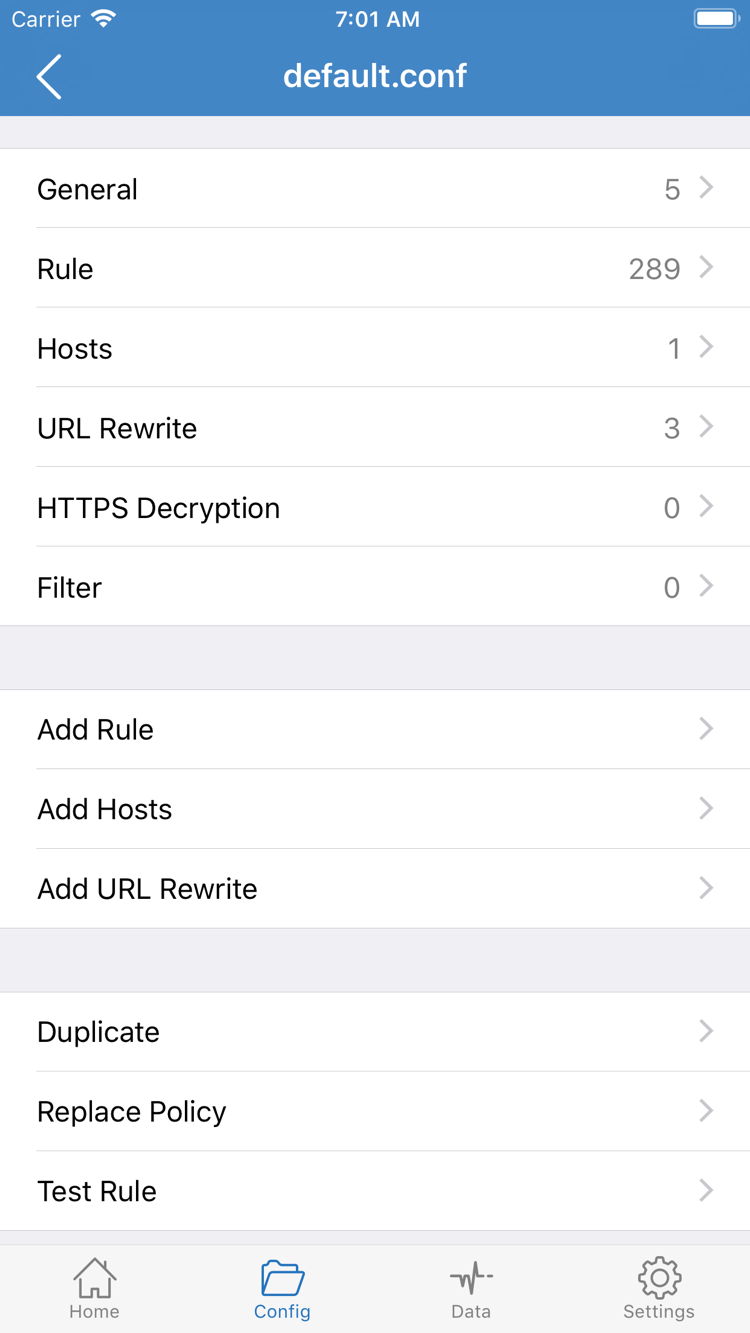
Choose Config for everyday rule-based routing. The client checks rules in the currently enabled configuration to decide whether a request uses PROXY, DIRECT, or REJECT. Open Config, confirm which file is in use, and check its Rule section. General, Rule, Hosts, URL Rewrite, and HTTPS Decryption in the screenshot are separate settings sections. You do not need to change them all for your first connection, and there is no need to enable HTTPS Decryption for this guide.
Rules in Rule are generally checked from top to bottom. The first matching rule determines the policy, and FINAL handles requests that did not match earlier rules. The snippet below illustrates the order; you do not need to replace your configuration with it. Keep a copy of the original file before making changes so you can restore its rules.
[Rule]
DOMAIN-SUFFIX,example.com,PROXY
IP-CIDR,192.168.0.0/16,DIRECT
FINAL,PROXY
Proxy and Direct: use them for comparison
Proxy sends requests that need proxy handling through the selected server. It can help determine whether the server is available or whether a rule is sending requests in the wrong direction. It does not guarantee access for every app or network condition, and it cannot compensate for incorrect server details. Direct does not use a proxy server. It is useful for direct access or to rule out the proxy route; after choosing Direct, an enabled connection switch does not mean requests are passing through a proxy server.
If you already have a trusted configuration, start with Config to verify the connection. If only certain destinations have problems, switch to Proxy briefly and compare access to the same destination, then restore the original mode. For explanations of DOMAIN-SUFFIX, FINAL, and policies, see the glossary. For issues caused by rule order, continue to the troubleshooting manual.
STEP 03 / Establish the system connection
Turn on the connection switch at the top of Home
Done when: system authorization is complete, the switch stays on after returning to Home, and the status no longer shows Not Connected.
Return to Home and check the selected server in SERVER and the Global Routing mode once more. After confirming both, turn on the connection switch near Not Connected at the top. On the first connection, the system may ask to add a VPN configuration. Review the prompt and allow it, then confirm using your device passcode or biometric authentication if required. This authorization establishes the system network connection; it is separate from whether a subscription is valid.
After authorization, return to Shadowrocket and check whether the switch and status remain on. If the switch turns off immediately, read the system prompt carefully instead of repeatedly importing the subscription or creating multiple servers. Other VPN connections on the device, restrictions on a managed device, or an incomplete system confirmation may affect this step. You can disconnect other VPNs and try again in the app. For a device managed by an organization, follow the administrator's instructions and do not delete unfamiliar management settings.
The iPad layout may differ slightly from the screenshot due to screen size or Split View, but the order is the same: select a server, check Global Routing, then turn on the connection switch. If an option is hard to find, return to Home and, if needed, exit Split View before checking again. Do not mistake another switch in system network settings for the in-app connection button.
Once the connection status appears, do not change On Demand or adjust multiple options at once. An enabled switch only means the system connection has been established; the server may still fail authentication, or a rule may send the destination to Direct. Keep the current settings and continue to the next step to verify actual access and the complete connection path.
STEP 04 / Check the result
Verify the connection and rules
Done when: your intended destination is accessible and the request uses the expected policy.
Keep the connection switch on and run Connectivity Test from Home as a reference for connectivity under the current test method. A test result does not mean every website or protocol will work. A timeout should be assessed alongside the test destination, method, and actual access. Do not make major configuration changes based on a single test result.
- Check the basic network first. Use a browser to open a page that normally works and that you are authorized to access. If it still cannot load with the connection off, first check Wi-Fi, cellular service, or a network sign-in page rather than changing server details.
- Test the intended destination. Open a destination you expect to be handled through the proxy and refresh once to avoid mistaking browser cache for a new connection result. If only one app fails, compare it with an accessible page for the same service in a browser.
- Check the request policy. In the available request log or Data information, find the destination you just tested and check its matching rule and PROXY, DIRECT, or REJECT result. Log fields vary between interfaces; focus on whether the same destination followed the expected route.
If one destination works in Config and another fails, check rule matching, DNS resolution, and restrictions on the destination service. You can briefly switch to Proxy and test again without changing the server or destination. If Proxy works but Config fails, check the rules first. If both fail, check the server and route to the destination first. This is a diagnostic method, not a universal fix that makes Proxy the permanent answer to every issue.
Do not treat the exit address shown on a webpage as the only evidence. In Config mode, different destinations may use different policies; a direct connection to one lookup page does not mean all requests are direct. Record the destination, mode, selected server, and result during verification. Change one condition per test, then restore the Config mode you plan to use.
STEP 05 / Check based on where the failure occurs
Common issues and Settings checks
Identify where the problem occurs, then adjust the relevant setting. Do not reset every option at once.
Subscription saved, but no servers appear
Return to the subscription entry and check the update result. Confirm you pasted the complete link without extra spaces, line breaks, or missing parameters, then check whether your basic network can access the address. An expired link, a login page response, or an unsupported format can prevent the list from being generated. Contact your own service provider to confirm the link status. Do not share the full credential-bearing address with a public checking site. See the subscription update guide for details.
The switch turns on, but the server times out
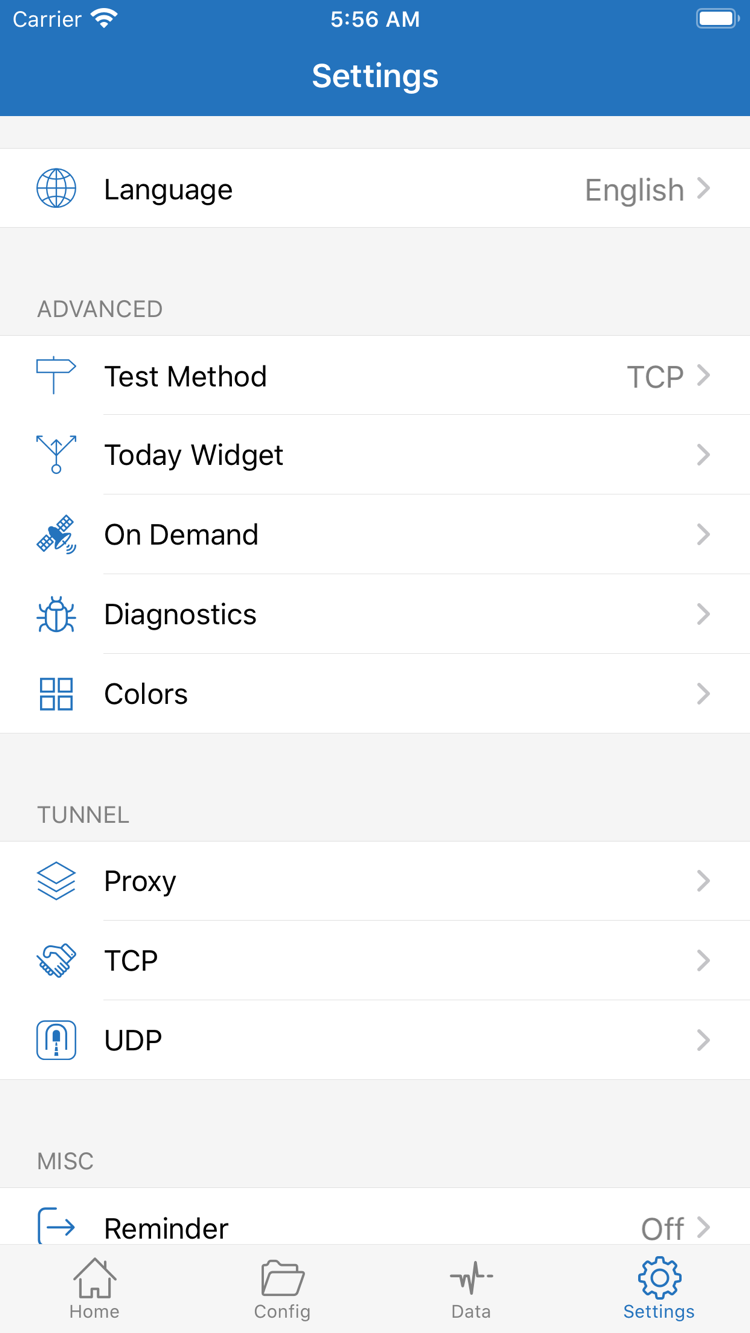
First check that the selected entry is the one you just added. Then verify Type, Host, Port, authentication fields, TLS, and transport parameters one by one. Confirm that the device's system time is set automatically. Open Test Method in Settings: different test methods measure different stages, so results from different methods cannot be compared directly. If the server is not responding, repeatedly changing local rules usually will not help.
Some webpages fail, or the connection comes back on its own
For issues with specific destinations, compare Config and Proxy as described above and check whether an earlier rule matched. If the connection turns back on after you disconnect it manually, check On Demand in Settings and see whether a trigger condition is configured. For first-time setup, verify a manual connection before configuring automatic connections. Note the original settings before changing automatic connection behavior so you can restore them after testing.
Settings also includes groups such as Proxy, TCP, and UDP. These are not options you must change whenever an issue occurs. If an app only fails for real-time voice or a specific feature, check the relevant item based on the transport type actually in use. Do not change every setting at random to make a single test pass, or you will lose a reliable baseline for comparison.
What to keep for further troubleshooting
Check the available diagnostic information under Diagnostics in Settings and use it alongside the time of the failure and the steps you took. Notes on whether import succeeded, whether the switch stayed on, the Connectivity Test result, which destinations failed, and whether Config differed from Proxy are usually more useful than simply saying “it does not work.” Before sharing logs, hide subscription links, passwords, personal server addresses, and other authentication details.
This completes the first-time setup. If timeouts, DNS issues, battery changes, or problems after an update persist, continue to the symptom-based troubleshooting manual. If you only need an explanation of a setting name, check the glossary instead of importing the entire configuration again.